Sunday, May 10, 2015

Homemade "Oreos"

Call me unnatural but I have never been a fan of Oreos. What kind of person even says that? Maybe it was the crunchy cookie. Maybe it was the hard icing...whatever it was I never really loved them. But today...I baked some chocolate sugar cookies and filled them with a thick buttercream and well, let's just say became a fan of my homemade Oreos. The recipe is on my recipe page on here. Apparently not. I am going to add it at the bottom of this post. Amazing Chocolate Sugar Cookies. It was a recipe I messed with and made my own by making some changes to it. Try them, you might like them.
I happen to have some imprint cookie stamps because if I am making a homemade Oreo it needs an imprint...I only imprinted the tops.
Put the filling in a piping bag with about a #4 tip or so.
Piped the bottom cookie.
Oh yes, they are larger than the original. 
 Delicious and the milk with it just hit the spot. Seriously, try them. 

Amazing Chocolate Sugar Cookies
Preheat oven to 350
1 Cup butter softened
1Cup Brown sugar
Mix together and then add:
1 Egg
1&1/2 tsp. vanilla
2 tsp. espresso pwd.
In a separate bowl combine:
2 Cups flour
3/4 cup special dark cocoa pwd.
1/2 tsp. salt
Add dry ingredients to wet and slowly start the mixer. Mix until just combined.
Roll out a portion between parchment papers and remove the top paper when the dough is about 1/4 inch thick, cut out your cookies as if they are laid on a tray ready to bake. remove the outside leftover dough and place the parchment with the cut out cookies on a tray and put it into the freezer for about 5-10 minutes.
Bake at 350 for 8 minutes for a 1/4" thick cookie or until the center isn't shiny. 

Vanilla Buttercream
1&1/2 cups pwd. sugar
1 tsp vanilla
1/2 cup butter
Cream together to make a thick buttercream.
When the cookies are cool pipe the room temperature buttercream onto the bottom cookie and top with another cookie.

Monday, May 4, 2015

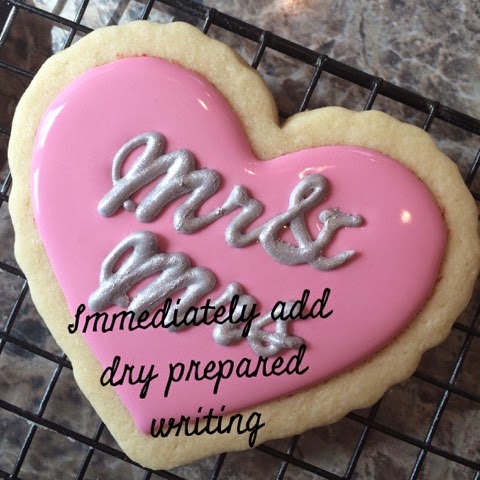
Wedding Cookies- Mr & Mrs

If I need to put writing on a lot of cookies, I print out what I want and put it under parchment paper then pipe over that, let it dry for at least 12-24 hours. This time I used silver lustre dust on the writing.
When I was ready to make the cookies I drew a line 1/4 of an inch in and flooded the middle heart with pink icing.  As soon as I finished one I would use tweezers to put on the Mr & Mrs I had made.
Then when they were all to this point I set the to dry for awhile.
After a couple hours I took some white and a ruffle tip and put the ruffle around the bare edge.
I left them all to dry at this stage for the rest of the day. Then about 5-6 hours later I piped on grey inbetween the ruffle and the heart as soon as I did one I sprinkled it with large silver sugar crystals.
I really like how they turned out.


Saturday, May 2, 2015

Mini Ice Cream Cones

I love little things. Small bowls, little silverware, tiny cups...you name it. Well, I saw these tiny ice cream cones and just knew I needed them. 
They are about 1&3/4 inches tall and about 1 inch across. SO cute. Well, again, I had cake still leftover so I made some ganauche instead of icing and mixed it with the crumbled chocolate cake. It was delicious so I made so little ice cream cone cake balls out of it. Before I filled them with the cake mixture I poured in ganauche and then poured it back out and put them upside down on a cooling rack to drain out more.
I also made some little apple tarts. I cut the apples into rings and cooked them in butter, cinnamon and brown sugar until they were soft but not falling apart.
To fill the hole I chopped up the small pieces and ends and cooked them in the same butter and sugar mixture. After I took the apples out to cool, I continued to cook down the juice and made an apple flavored caramel. I let those cool in the fridge. So today I made the pie dough and used two different size round cutters to make the tarts.
I brushed them with egg wash and sprinkled them with green sugar.
Baked them at 375 for 30 minutes on a parchment lined tray.
After they were done I drizzled them with the caramel that I made out of the juice. 

Rainbow Dust Pro Gel Food Colors

They are here!! All the way from the UK! And I am thrilled.
If you count in this picture there are 36 tubes and I actually ordered 37 colors....
Funny story: I was reseaching pink food color because I have so much trouble getting a good pink. The general consensus was Rainbow Dust Pro Gel Strawberry. So I went to order that color and saw all these other wonderful colors and as much food color as I go through it was, in the long run, less expensive than getting them one at a time. So I ordered them. When the package was delivered I was so excited!! I opened them all up laid them out like you see them and oops two of the color terracotta. So I get the list to figure out what color I am missing...Strawberry...the one color that caused me to go online and look at these colors. I contacted the company I got them from and they got right back to me and said they would send out the Strawberry one the next day. I was impressed and grateful. 
Yesterday was the maiden voyage for using one of them. 
It just happended to be grey.
So it gets the honor of being used on the blog.
I am making some wedding cookies for a friend and made the words for the cookie ahead of time on parchment. But more about those when I do those cookies.

Thursday, April 30, 2015

A new outlet for creativity: Cake Pops

So I had so much cake left from the birthday cake I made Jayme that I have tried making different cake pops as a way to use some of it. 
I made these ice cream cone ones for the kids to give away for May Day. Apparently not all states make such a big deal about May but here in the Midwest it is a day for kids to run around and leave treats on the front porches of their friends and hopefully not get caught. 
Jayme shares a birthday with her brother-in-law so I made some more and his mom took them to him at school.
She gets the credit for arranging them in the burlap. 
Then today I decided to use a Trader Joe's Lemon Zinger cake that I had and cut small circles out and layer them in tiny layer cakes to make these. I didn't mix the cake with icing because it is a dense, moist cake and with a little pink candy inbetween they stayed together. 
So that is my fun with cake pops so far. I am sure they will make an appearance some other time.

Tuesday, April 28, 2015

Minnie Mouse Cake Pops

I had cupcakes left from making the chocolate cake last week so yesterday I decided to see if I could make Minnie Mouse Cake Pops. I loved doing it and I think they turned out perfect!
You can sort of see in this picture above that I drew the circles for the ears and the bows then turned the parchment over so I would not get lead in the candy coating. I piped on the black circles. Then when they were hardened I piped on the bows and as I finished each bow I sprinkled white nonpareils on them. It is very important to make sure the ears are dry before using the nonpareils because you don't want them to stick to the ears. After the ears and bows were hard I dipped one cake ball and placed the ears into the coating then placed the bow. It worked perfectly. Easy and very fun.
I had just bought a new printer and it had the styrofoam in the box so that got used to put them in while they dried. Any port in a storm! 

Monday, April 20, 2015

Wine bottle birthday cake

Bobbi and Ashley are having a party for Jayme's birthday. A wine tasting party at Bobbi's. So I got inspired to make the cake. Today (Monday) I created a gum paste and royal icing label to put on the iced cake. I had to find a bottle that is the size of the finished cake so that it would have a rounded shape as it dries.
I made the cakes to put in the freezer so that all I have to do on Saturday is ice the cake and finish with making it look like a wine bottle. The cakes I made in my sandwich loaf pans. Perfect. 
I will just have to carve them into shape.
Then I rolled out a bit of gum paste and when I had it the thickness I wanted I put a piece of vintage plastic shelf liner (never been used. It was new old stock that I found at an antique store. A whole roll.)
on top of it and rolled again to impress the lace image onto the gum paste. I used a large present with a bow cookie cutter to make the shape.
Put that on parchment on the bottle that I found to fit the finished size of the cake. Then I took some gold Luster Dust and lemon extract and painted it gold.
That really helped the lace stand out. Then I took white royal icing and 4 different piping tips and piped on the name with a caligraphy tip, the vines and other writing with a #1, the leaves with a tiny leaf tip, and the grapes with a #3.
 I actually like the monochromatic look a lot but the painter in me wanted to add color so...out came the purple, green, brown and pink Luster Dust.
Extremely happy with how it looks. Can't wait to finish the cake and see it all done.
Well I have finished the cake and it has been eaten.
But before I get to that, I must say that I indulged a dream that I have been fostering for awhile and taught myslef how to make gum paste flowers. 
I really wasn't planning on using them on the birthday cake I just wanted to try making them. But after I got done I had to create a way to use them on with the cake.
So I baked a small chocolate cake and made it look like a basket. That was really fun to do also. So it was time to carve the bottle out of my long layers.
I started cutting and then when I thought I had it I cut some more to get a rounder shape. I wish I would have made the neck longer but I didn't so there you have it...
I added a cork at the top and rounded the bottle. I used buttercream icing and smoothed it with a Viva paper towel. Then I took a deep breath and put the label on and put the little basket cake next to the neck.
The label fit and I didn't break it so I could breathe normally. I filled the basket with green using a leaf tip. Then I placed my flowers that I made.
As I worked I kept adding more icing leaves around the top and side of the bottle. 

I thought I was done here...but no...I wanted a flower between the "gouda cheese" (which is really a chocolate cake covered in fondant. my first try with fondant. really fun.) And the wine bottle. So I decided to try a poppy. It turned out even better than I imagined.
But still not quite complete so, a leaf.
Ok, at some point I have to tell myself to clean up the mess and stop adding things!! haha but I was very pleased with the end result.
I also made wine glass cookies and wine label cookies.


Everything all together and Jayme with her cake and cookies.


Happy Baking,

Patti