Tuesday, August 2, 2016

Gossie and Gertie Cookies

I can't believe I never put these up on here! Good grief! I had found a kids book and the pictures were so cute that I just wanted to make them into cookies. So before Easter I made this set then used them at everyone's place for a little decoration. 
After the white had dried overnight I took a grey food pen and drew on the characters using my Camera Lucida app on my iPad. It projects the image onto the cookie in a sense. It takes some getting used to but I love it.
Then I used a #0 tip and put the white on white shapes onto the cookies letting them dry where I wanted a line or division on the image.
Let those dry completely then water colored with gel food colors on the raised image. I LOVE how these turned out! It was almost hard to eat these.


My set up for painting. I love to paint and decorate cookies so this filled both those loves!
The cookies with the book. 

Monday, August 1, 2016

Crawfish Boil Cookies

The other day my son-in-law, Travis, called me and said to look up live crawfish and then call him back. He makes me laugh! So I did and in the second phone call we decided to do a crawfish boil. There is a company called Louisiana Crawfish that will overnight you live crawfish so you can have one. Things are in the works for that to happen August 12. While looking at pictures for boils the colors and shapes just were too good to not make cookies of. I dug through cutters and came up with designs.
For the crawfish I used my #9 or 6 cutter from my 3" numbers set. The sausage was my crayon cookie cutter trimmed down. The potato was a 2 inch round cutter and the corn cob was a square with scalloped sides trimmed so it was a rectangle and rounded off ends.
Traditionally a boil is poured out onto a table covered with newspaper so to mimic that I just painted a very thin layer of very thin white icing onto my #9 cookies and let it dry completely (it only took about 30 minutes.) Then I had this stamp (below) very clean!! And used it with painted on black gel food coloring. Randomly stamped them to get that effect.
I drew a template from my sketches and cut it out. I number the sections according to the order I will apply the icing. You will notice as I began working with these I changed my order a couple times! I traced the template outline on with a red food pen then filled in the inside lines freehand.
my red color in all the sections marked #1.
Sections marked #2 after #1 dried for about 15 minutes which is easy because by the time you get done with all the #1 sections on all the cookies the first ones are ready for the next step. I also added the antenna things to the nose.
Section #3 on the tail and because I had cut a tiny tip on my tipless bag I waited to do the head section which was bigger until after I had done all the legs.
The legs were done with the tiny tip after the tail sections dried a bit then I trimmed the tip a little bigger to say a size two tip and filled in the head and put a tiny black sugar bead on for the eye. I use my cookie tweezers for that!
Well I wanted tiny lines again so I put the bag inside another bag and trimmed a tiny bit off and piped the eye piping and mouth area piping. 
I liked them but thought I could make them better so I got some brownish food color and painted the shadows in then watered down an ivory icing and painted it on the highlight areas. It gave them texture I wasn't expecting but really like. And I love that it looks like they are on newspaper.
Ah the corn...I did these late at night and totally got into it and didn't take any progress pictures...sorry. But to achieve this the base is a darker golden color and on the cut end some white is swirled in while it is wet. Let that base coat dry for 15 to 20 minutes then using a bit thicker than flood icing pipe every other kernel then after about 15 minutes go back and pipe the ones you skipped. Right after you pipe those sprinkle with a little black sugar and some sugar crystals you can see the "salt" if you look really close. In real life it shows well. Pipe along the "behind" kernels with the darker golden color and let dry. When they are dry take a caramel color and watercolor the edges to give the darker shadow effect on each side of the cookie.
Sausage links are traditional in a boil also so I made a few of those. I just dotted a reddish color with black and beige to mimic the sausage inside the casing. 
Then I used brown (I got it a bit dark) for my outside cooked casing. 
Let it dry and painted on some black for shadow and beige for highlight.
For the potatoes a reddish brown also and beige. I decided to do potatoes that had been cut in half.
I didn't want my red color to smooth out so I messed with it after I put it on to create the "eyes" 
Then I used brown to watercolor the skin and caramel to watercolor the flesh part.
All done and I just happened to have a piece of fabric that was newspaper print so I used that for my background for the cookies. 
It looks like a pretty sweet crawfish boil to me. 


Fruit Cake (literally)

Our 35th Anniversary was July 25. All our kids plus some that we consider our kids, were coming to dinner. So I made a cake. Vanilla cake, strawberry buttercream, dark chocolate ganache, and chocolate dipped strawberries, cherries, blueberries and blackberries. 
It was delicious. 
The strawberry buttercream was made by pulverizing Trader Joe's freeze dried strawberries (1 bag) into a fine powder in my processor and adding it to vanilla buttercream. It was amazing. I don't like the artificial flavorings because sometimes I just taste a weird alcohol taste. This just tasted like fresh strawberries. It works with raspberry too but you must sift it to get out the seeds or that is just nasty icing with seeds. I suppose it would work with any freeze dried fruit. I now have bags of all sorts of freeze dried fruit in my pantry! Haha

Corn on the cob skewers (not a cookie)

Ok this isn't a Cooke but...
TRY THIS!! I cut corn on the cob into 3 inch lengths cut up some peppers and onion put one piece of corn onto the skewer (this takes some work and in hind sight I should have used metal skewers) DON'T STAB YOURSELF then put on peppers and onions for about 3 inches then another piece of corn. Spread softened butter onto the top of all of it, salt and pepper then wrap into a foil packet. Let the skewer stick out if you need to but I wrapped the whole thing into the packet. Then I put them on the top rack of my grill for about 15 minutes and while I was grilling the kabobs we were having with them. I didn't turn them or anything. They were so good! 

Cars, Trucks, Tires and Two

A friend of Bobbi's asked me to make some cookies for her son's 2nd birthday. Anything to do with cars! 
I found this amazing vintage typing table at a flea market (2 actually) and the guy said "you can have both of those for $5!" How could I not buy them!! They are the perfect height for decorating cookies. So I can move them wherever I want to go and hang out with Bryan and decorate cookies! 
I thought the 2 just needed to be a road and then I found this tiny little car stencil and thought it needed to be on a few of them.
Bright colors and actually the only vehicle cutters I have are a Volkswagon and a truck...sadly lacking in the boy cutter department. Well, I guess I have a firetruck and and airplane but moving on...
This is actually a truck cutter that has a Christmas tree in the back but I trimmed that off when I cut them out. And when I look at these I see all the things I could do differently but I was going for a coloring book type look so...whatever! People will still eat them! 
Wheels...
Like I said I see so much I wish I would have done differently but...live and learn. I didn't sketch this set out first and I usually do that. Note to self sketch the set out!! Haha but I love the colors and am satisfied with the outcome.


Airbrushed Northwoods Cookies

I knew that my sister would be coming through on her way to her cabin in Montana and I wanted to make her some cookies to keep in her freezer for when all her guests were up there visiting. I also wanted to use the cookie cutters that I had gotten at Bass Pro Shops! And I wanted to keep the process simple and use my airbrush which I have had for a couple years and have been afraid of. Haha 
So I just iced all the cookies and let them dry for 6 - 8 hours probably overnight. I do use a Stencil Genie (look it up, they help a ton. It's a great cookie product). Another part of airbrushing is having the item you are airbrushing at the right angle, flat on a table can be done but up at an angle is just so much better so...I use this
It happens to be an antique bed tray that has the ability to tilt up. I put parchment behind the cookie so I don't have too much overspray to clean up. Unfortunately this picture shows a cookie I was just painting straight gold but you can see that pink square with a stencil in it at the bottom of the picture and that is the stencil genie. Anyway that crown was for something else...Northwoods Cookies onward.
Rainbow trout - not done with the air brush but done with Wilton Color Mist colors because who wants to wash out the airbrush 7 times...the dots are just black coloring and a splatter stencil from Tim Holtz. After I took these I decided that the fish needed a black dot for an eye. I did add those but didn't take a different picture.
Most of these stencils are just random ones that I have never used for anything but I have them. So I just decided to make the designs on each cookie whatever I thought looked appealing. 
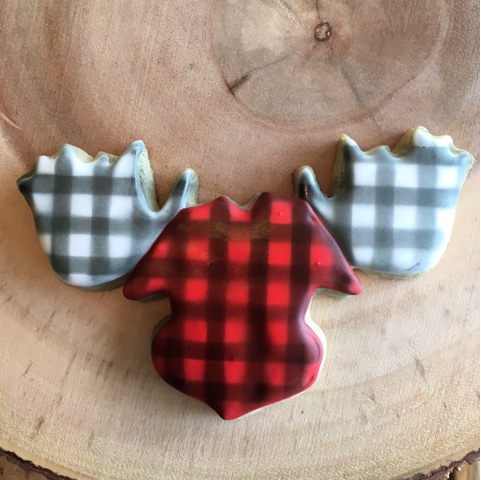
This moose might be my favorite simply because I love the fact that it looks like a comfy flannel shirt. And at the cabin no matter the month you need a comfy flannel shirt just in case...last year when we were there on July 28 it snowed. Yes, I am being truthful. The weather channel even asked me if they could use my picture that I posted on Instagram. 
The canoe was sprayed with red because I think red and turquoise are an awesome color combo but on the blue it turned brown and actually I like that too. Love this stencil.
This one just made me smile. Cabin in the woods...I used thicker red icing after the spray was dry to stencil that little saying onto the cabins.
The bear was originally beige, brown and just gold, as you can see from the picture of all the cookies below, but when I went to pack up the cookies for some reason the gold was still really tacky so I solved the problem by using gold sanding sugar and actually liked it a lot better. A bear in the woods.
Quite pleased with my venture into airbrushing. I have done it before but not to the extent of a whole set. I think I will edit this post when I get pictures from Jen with the cookies being eaten at the cabin. 😊

Saturday, July 30, 2016

Marauder's Map

One day I had a little extra dough, some random icing and decided to recreate the Marauder's Map from Harry Potter. I did two but this one is by far the best one. it is freehand drawn on dry icing that I watercolor painted with food colors.

Happy Baking,

Patti